In a nutshell, bridging is associated with power amplifiers, not any other kind of mobile sound equipment, and refers to a method of combining an amp’s channels to squeeze additional power out of it – assuming, of course, the speakers you have connected to the amp can handle that extra juice.
In this article, we’re going to explain the ins and outs regarding how to bridge a car amplifier so you can determine if the effort is a worthwhile addition to your installation plan.
Table of Contents
Understanding “Bridging” on a Deeper Level
As we alluded to above, bridging refers to combining two (four) channels of an amplifier into one (two) channel(s) with twice the voltage.
Normally, an amp is bridged to combine two channels to power one subwoofer or to combine four channels into powering two subwoofers.

To be sure, a so-called “monoblock” amplifier – that is, an amp designed to power just one channel (speaker) at a time – cannot be bridged.
Bridgeable amplifiers are designed with an “inverted” channel for bridging purposes; this channel produces voltage generated at the opposite polarity of the standard, un-bridged channel.
What this all boils down to is this: Bridging an amp yield almost four times the amount of power as it would run in an un-bridged status.
Let’s now take a look at the ways to bridge two- and four-channel mobile audio amps.
How to Bridge a Two-Channel Car Amplifier (To Power a Subwoofer)
To start with, it’s important to note that most amplifiers, when bridged, cannot drive a speaker or sub with an impedance less than four (4) ohms.
Once you’ve picked an amplifier that can output a suitable amount of power through the correct impedance load (four ohms or more), it’s time to get into the bridging process – which, when completed successfully, depends on there being signal in both the left and right channels of the amp.
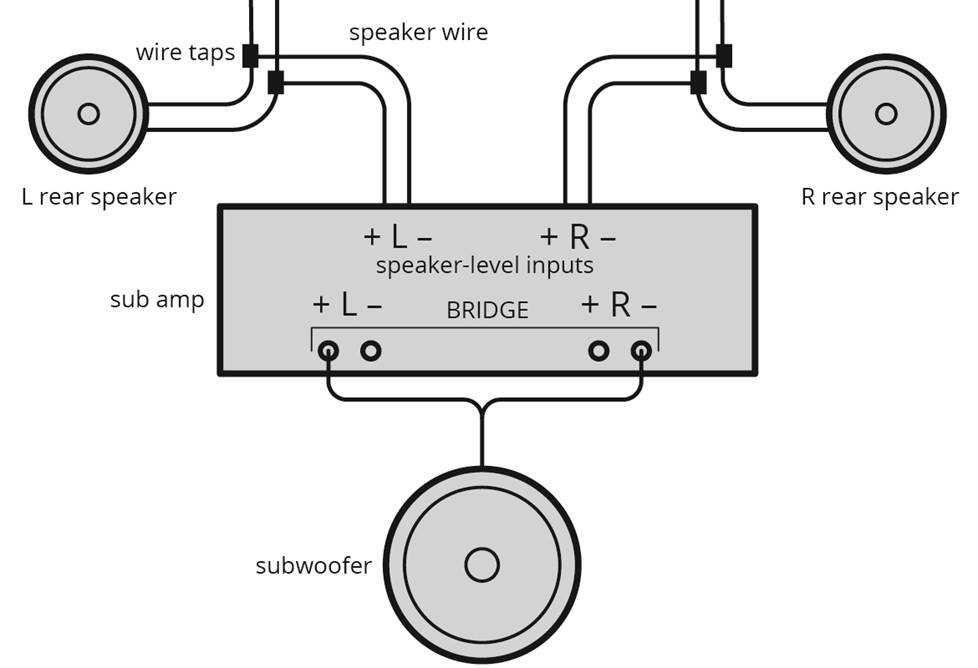
If using your factory stereo (not an aftermarket type with preamp outputs), what you would first do is tap into the rear left and right factory speaker wiring and run speaker wires to a speaker-level input plug that comes with the amp.
To achieve bridged output, connect the amp’s right negative output terminal to the sub’s negative terminal, and the amp’s left positive terminal to the sub’s positive terminal.
In such a scenario, the hookup would look like this diagram.
The videos seen here will provide a visual aid for bridging car amplifiers.
How to Bridge a Four-Channel Car Amplifier (To Power a Pair of Component Speakers)
Another common amp bridging scenario is to drive a pair of component speakers for the front of the vehicle’s system only, using an aftermarket head unit (receiver).
You can run rear speakers off of the receiver’s internal amp, and, to keep things simple in our example here, we’ll assume there’s no subwoofer.
Through the magic of bridging, you can take a four-channel amp that puts out, say, 30 watts RMS per channel (i.e. not a lot of power) and have it deliver two channels of 125 watts RMS when bridged. How is this achieved?
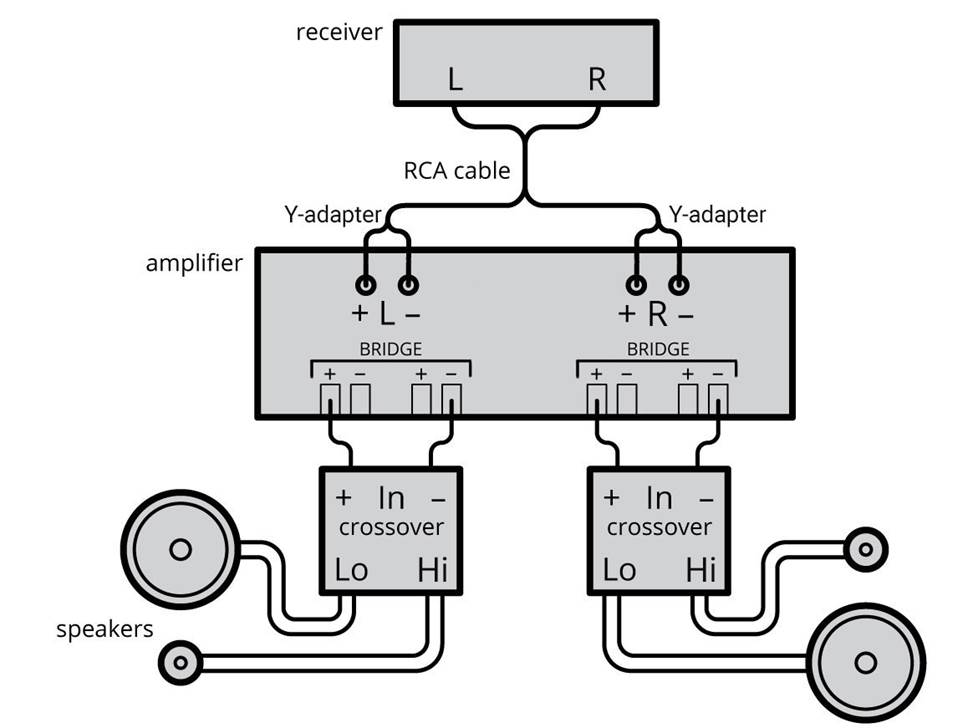
- Run a dual RCA cable from the head unit’s front left and right RCA outputs.
- At the amp end of the cable, attach a “Y adapter” to each RCA connector so you end up with four RCA connectors to plug into the amp’s four RCA inputs.
- For the outputs, connect the amp’s front right negative output terminal to the left speaker’s negative terminal while connecting the amp’s front left positive terminal to the left speaker’s positive terminal; the same connection scheme applies to the rear amp channels going to the right speaker.
In this scenario, the hookup would look like the second diagram on this page.
Concluding Thoughts
Remember that when an amp is bridged, the resistance load (measured in ohms) is cut in half, effectively – and here’s a good example: If you are using a bridged amp to power a four-ohm subwoofer, the resistance load drops to two ohms. It is vital that you ensure the amp you’re using is up to the task of handling a two-ohm load.
Also, never let your amp drop below its minimum resistance level (again, in ohms) because overheating can damage the unit beyond repair.
In the same category: Connect two amps with a single power wire