Simple malfunctions, like buttons not working or the display freezing up might require a simple reset to fix. If an overhaul of all settings is what you are after, a factory reset can take you back to the start and allow you to make the changes you need. So how do you factory reset the Kenwood car stereo?
Table of Contents
Double DIN receivers – Method 1

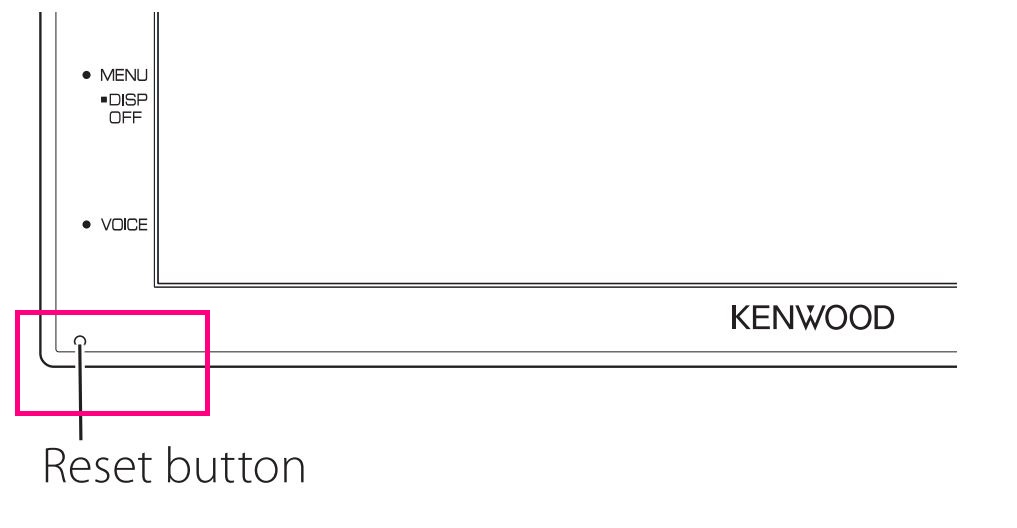
This is the method on how to reset a Kenwood touchscreen radio to factory settings, more accurately the DMX4707S, DMX47S, and DMX5020S units. We’ve taken this info from the unit’s manual.
Step 1:Simply press the <Reset> button (see top image) and the factory settings are restored.
TIP: Although some older models required to hold the reset button for 5 seconds, this manual doesn’t propose that. The best thing is to check it on your own.
NOTE: Make sure the USB device is disconnected before pressing the <Reset> button. It is possible to damage the data stored in the USB device by pressing the <Reset> button while it is still connected.
Single DIN receivers – Method 2
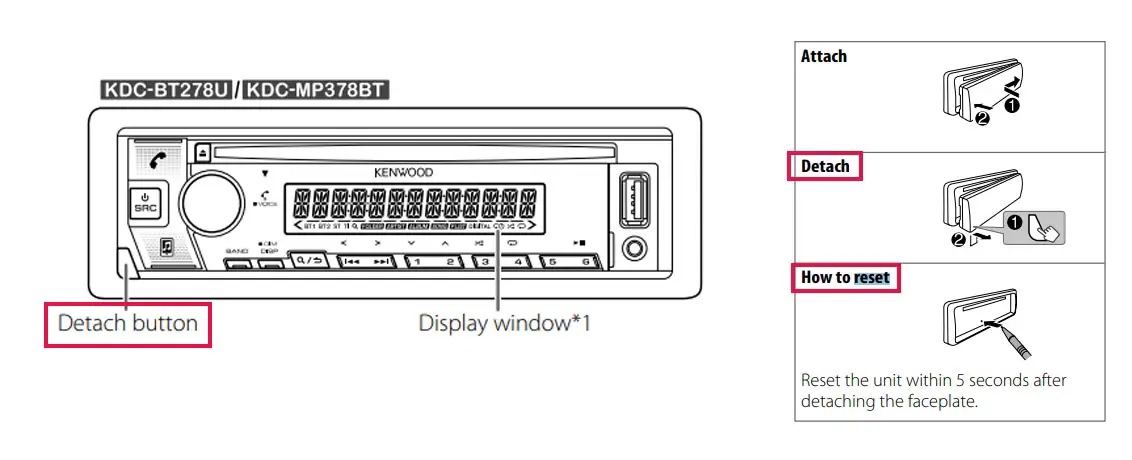
This method of resetting your car stereo can be used to reset models such as the KDC line more accurately these models KDC-X704, KDC-X304, KDC-BT778HD, KDC-BT378U, KDC-BT360U, KDC-BT34, KDC-BT278U, KDC-MP378BT, KMR-D378BT Source.
Step 1: The stereo must be powered up for the reset to work. Put your car key into the ignition and turn until the lights on the stereo power up.
Step 2: Find and press the Detach button in order to carefully take the faceplate off the stereo. The Detach button is usually found in the bottom left corner of the stereo.
Step 3: Locate the small reset button located on the stereo (see the image above). Press it with a pointed tool and hold for 5 seconds. This will perform the reset task. Just remember, the action will not work if your stereo isn’t powered! Also, you must reset the unit within 5 seconds after detaching the faceplate.
The older models (pre-2016) – Method 3
This method is used to reset Kenwood Excelon DDX touchscreen models like DDX9703s or DDX9702s among others. There are two possible resets to perform – the Soft Reset as well as the Factory Reset. If you find the stereo is unresponsive or shows some minor malfunctions, a Soft Reset might do the trick. Here’s how to achieve it.
Soft Reset
Find a pointed tool such as a small screwdriver, locate the small red triangle light-up button located on the top left of the stereo and press it down for 5 seconds. This will reset your Kenwood stereo.
Factory Reset
In order to bring your Kenwood Excelon DDX back to factory settings, follow this method:
Step 1: Press and hold the Eject CD button found on the left of the CD slot and the Volume button at the same time.
Step 2: While holding these two buttons, use a pointed tool to press the small triangular reset button, found in the top left corner of your stereo (you might find the assistance of another person handy). Keep holding the Eject CD and Volume buttons until the stereo boots back up. You can let go once it switches back on.
Step 3: Once the stereo is on find the “Initialize All” button on the touchscreen and tap it.
Step 4: Once prompted, press the small triangular reset button once more. That will take you back to factory settings.
What does HF ERROR 68 mean?
It means that the unit cannot communicate with the cell phone. In this case via Bluetooth. If this message keeps appearing you’ll need to Reset the unit. You can try a couple of things to resolve this issue.
Kenwood radio security code
Kenwood sets security codes for its stereo systems to protect them from theft. This security check activates whenever you remove your radio from the car battery. Many times this security feature even locks the legitimate owners out of their Kenwood radios as well, especially after any fixing/repairing activity under the hood.
If you are also facing the same issue and trying to find out how to unlock the Kenwood radio, continue reading this guide.
Conclusion
The method of resetting your Kenwood car stereo varies on the model and the depth of reset required. Still, it’s fairly simple if a tutorial is followed. In case of any questions, please leave a comment below. We will be more than happy to help you out.
Connected articles:

