Do you have a JVC car stereo fitted in your car? If you do, you need to know how to properly reset it, as you may one day need to do it.
Read on to find out what are some of the reasons why you might need to perform a reset as well as an actual tutorial on how to reset a JVC car stereo. We are providing reset instructions for both single and double din units (touchscreen also).
Table of Contents
JVC KD (and similar)
1. The Paperclip method
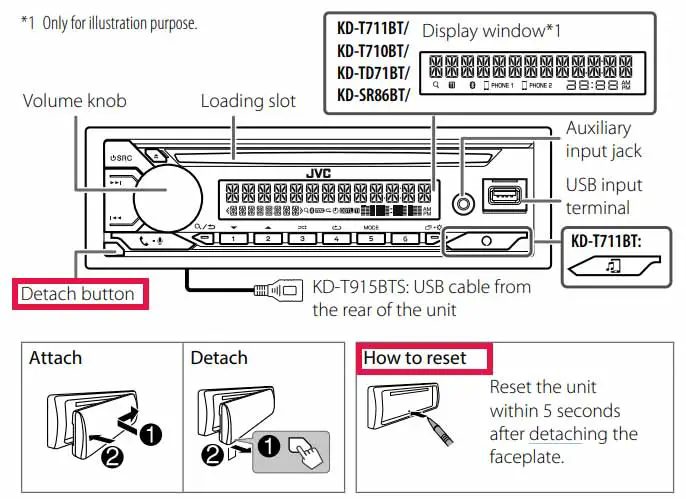
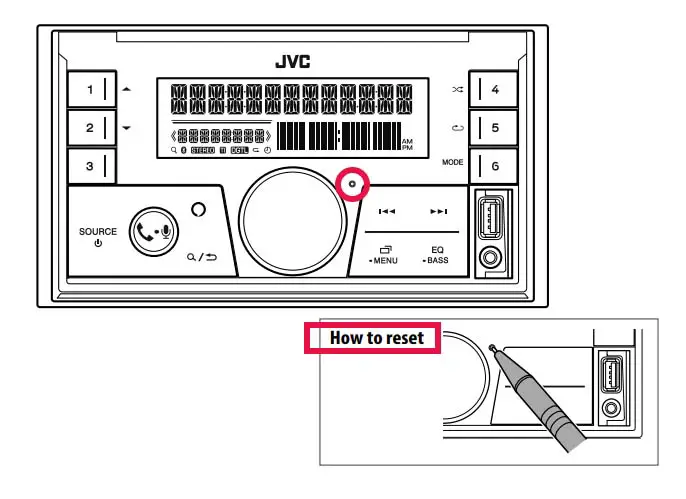
This method works with detachable single din units that have the Reset hole under the faceplate like the KD-T905BTS. Source.
Step 1: Detach the faceplate using a Detach button (see image).
Step 2: Find the reset hole. Use a pin, toothpick, or a similar tool to press the reset button inside the hole. Be advised that you must reset the unit within 5 seconds after detaching the faceplate.
Step 3: Put the faceplate on.
This is the method in which you use the function buttons on your faceplate to factory reset a JVC radio.
- Step 1: Press and hold the [WHEEL] button on the unit.
- Step 2: Turn the volume button until the [FACTORY RESET] option comes onto the display. Then press the knob.
- Step 3: Press [YES] to reset the unit.
Method 2 – Double DIN – In-Dash Receivers
This method works with double din units that have the Reset hole on the faceplate like the JVC KW-X840BTS. Source.
Step 1: Find the reset hole. Use a pin, toothpick, or a similar tool to press the reset button inside the hole.
NOTE: Disconnect the USB device before pressing the Reset button. Pressing the reset button with the USB connection can damage the data stored in the USB.
Method 2a – Double DIN – Multimedia Receivers
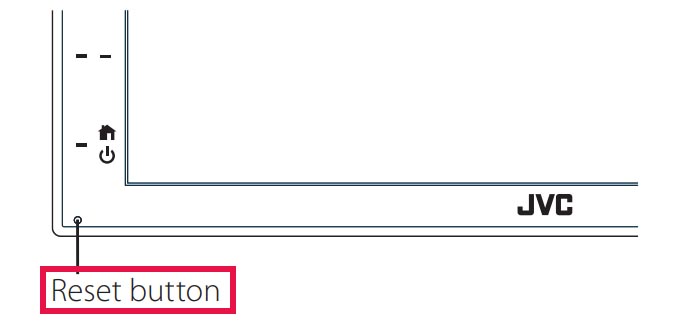
This method works with multimedia JVC double din units (touchscreen) that have the Reset hole on the faceplate like the KW-M560BT. Source.
Step 1: Find the reset hole on the faceplate (see image). Use a pin, toothpick, or a similar tool to press the reset button inside the hole.
NOTE: Disconnect the USB device before pressing the Reset button.
Method 3
This is an old method of resetting that might work as well. Reset your stereo by pressing the “ON” and “Select” buttons down at the same time for 6 seconds. It’s the simplest way to erase the internal chip memory and return your JVC car stereo to factory settings.
However, take care not to press the buttons down too hard, as this may damage internal components!
Why you might need to reset your JVC car stereo?
So why do you even need to know how to reset your car stereo? Although the reset task is not something that needs to be done on a periodic basis, there are multiple situations when it may be required.
For example, you might choose some wrong settings on your stereo and not be able to change them back, simply because you choose the wrong language or forget how to do it.
To return everything back to normal, a reset might be your only option. Also, a reset might be the quickest fix if something in your sound system starts malfunctioning without a good reason. If your radio is not tuning properly, not playing CDs, or not picking up a Bluetooth signal, it might be good to check if a reset is a simple fix.
Happily, the resetting process is simple and can be performed in just a few minutes, if you follow our tutorials. There are actually two ways to perform a reset on your JVC car stereo and both methods are described below. It’s worth noting there are multiple different models of JVC stereos that you may find in your car. It is always recommended to follow the manufacturer’s guidebook regarding the specific model, as the reset task may vary slightly.
JVC car stereo Protect Mode
Here, we will discuss two ways in which you can get your JVC radio out of protection mode.
Protection mode in most car stereos highlights a problem with the output connections (speakers and speaker wirings or amplifiers). Many times, a car stereo goes into protection mode without the owner realizing it.
They only come to know about it when they start the stereo next time to see the screen displaying “protection mode” “protecting send service”, and other similar messages, and the head unit refuses to play any sound.
H/W Error
What does a H/W error mean on JVC radio and how you can resolve it? Let’s find out.
AnH/W error means different things on different devices. For instance, when a computer system shows a H/W error, it indicates there is a malfunction of hardware anywhere within the system.
Some car stereos also display this message when one or more than one of their features is not functioning properly. For instance, JVC car stereos often show this message in one particular instance.
Connected articles: